⚠️ Info: Our Discord has been compromised. Do NOT click any links from the old Classic. Leave the old discord for your own safety. Our New Discord: https://discord.gg/gJgK7ytPrW
Setting Up Exit Lag: Difference between revisions
Jump to navigation
Jump to search
No edit summary |
|||
| Line 1: | Line 1: | ||
=== How to Set up Exit Lag: === | === How to Set up Exit Lag: === | ||
[[File: | [[File:Exitlag Demo.webp|alt=exit lag screenshot|right|frameless|723x723px]] | ||
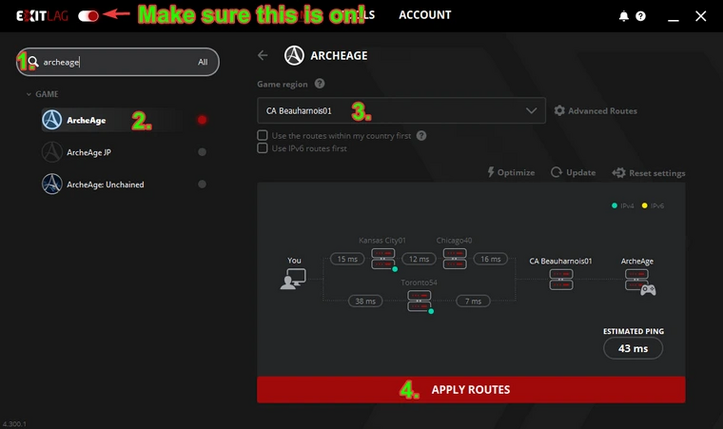
Please refer to the image on the right if you get confused. | |||
# Search for Archeage | |||
# Click the Archeage entry | |||
# Set your Game Region to CA Beauharnois01 | |||
# Press Apply Routes. | |||
Congratulation your game will now be routed with ExitLag! | |||
=== Checking Ping to server: === | === Checking Ping to server: === | ||
Revision as of 06:34, 12 April 2024
How to Set up Exit Lag:

Please refer to the image on the right if you get confused.
- Search for Archeage
- Click the Archeage entry
- Set your Game Region to CA Beauharnois01
- Press Apply Routes.
Congratulation your game will now be routed with ExitLag!
Checking Ping to server:
If you're not in game
- Click on the link OVH Speed Test
- Click on Server selection
- Select [CA] Beauharnois
- Start the test
If you're in game
- Press Ctrl Shift Esc to open Task Manager
- Select the Performance Tab
- Click the 3 dots and open Resource Monitor
- Select the Network tab in Resource Monitor
- Under TCP Connections locate archeage.exe
- Observe Latency column